Blog
Load a CSV File into a custom table within the Application Database using a Dashboard Button
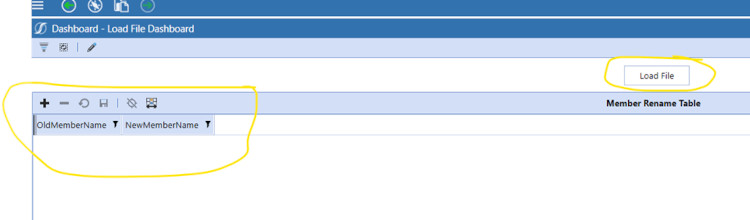
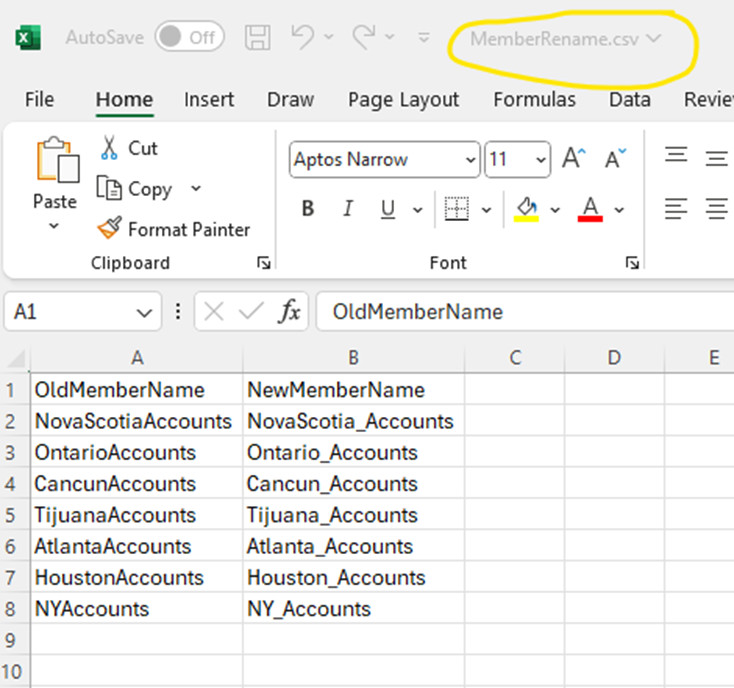
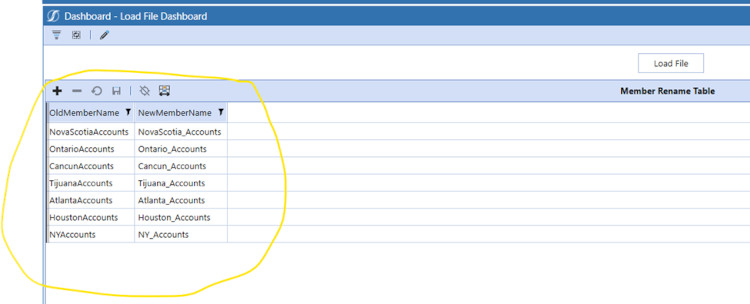
Ultimately this article will show how to load a CSV File containing to columns of data into a custom SQL Table sitting in the application database using BRApi.Utilities.LoadCustomTableUsingDelimitedFile I have already created a dashboard group that contains a dashboard with a toolbar that contains a button that loads the file to the table and a dashboard with an embedded SQL Table Editor that will show the results of the loaded file. The file and the table that the file will be loaded to both have 2 columns (fields), OldMemberName and NewMemberName.
The screen shot shows the dashboard with the button and a SQL Table editor showing the table that will contain the data.
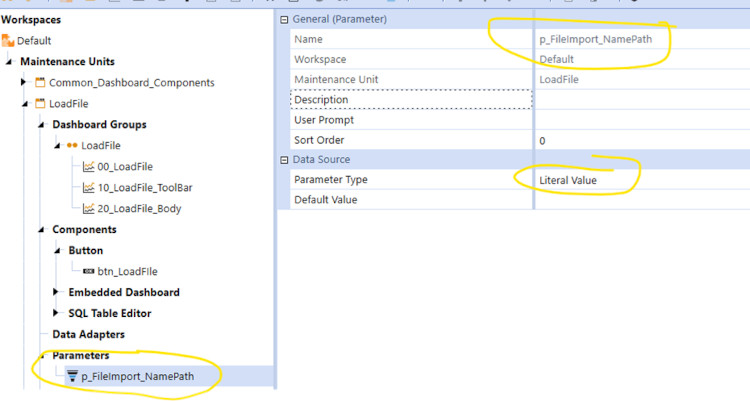
Parameter Creation
1. Create a literal parameter and name it p_FileImport_NamePath
Button Creation
1. Create a button and select the File Upload Button Type.

2. Select the File Share Destination File System Location

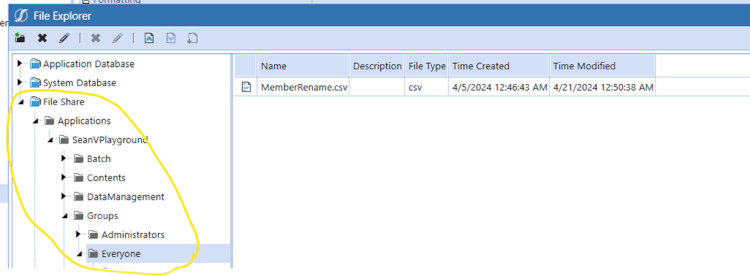
3. From the ellipsis to the right in the Destination Full Folder Name, navigate to the location where you want the file to be uploaded to. In this case I am using Applications/SeanVPlayground/Groups/Everyone
4. I also selected True for Overwrite Existing File.
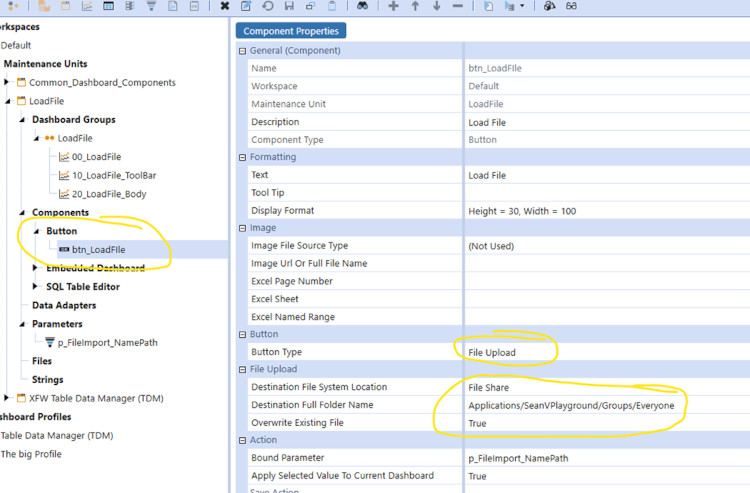
5. Enter the name of the Literal Parameter that you created previously, p_FileImportNamePath. This parameter will hold the File Path.

6. Change the Selection Changed Server Task to “Execute Dashboard Extender Business Rule (General Server)”.
7. In the Selection “Changed Server Task Arguments” you need to enter the name of Dashboard Extender Rule that will be created in a later step. Here I am using a Dashboard Extender called DBEXT_LoadFile and a function called FileImport, with an added argument FileNamePath = name of your literal parameter that you created in step 5.

At this point you should have a button with the following settings either selected or entered.

SQL Table Editor
I also created a SQL Table Editor to display the contents of the custom Application table on the dashboard. Note the table name, XFC_Member_Rename. At this point the table has not been created, it will be created in the Dashboard Extender that also loads the file to the table.

CSV File
I will be loading a CSV File that has 2 columns of data, first column header is “OldMemberName” and the second column header is “NewMemberName”.
Dashboard Extender
I have built out a Dashboard extender that both creates the table that will hold the data and loads the data from the CSV file. For this example, it requires a CSV file, with 2 columns. Error handling could be added to check if it’s a CSV file, if the columns of data contain the data you are expecting, etc. I have done this in the past by first loading the file to staging table, then writing SQL checks against the data in that table, returning error messages to the user if there are data issues, etc. None of that is being done in this example.
1. In the “ComponentSelectionChanged” section of the Dashboard Extender add the If Then that will call the custom function (FileImport). In addition, there is a line of code that gets the parameter that holds the file path and passes that to the custom function using args.NameValuePairs.XFGetValue
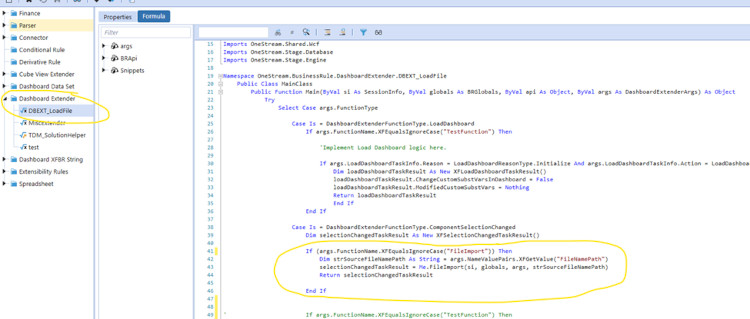
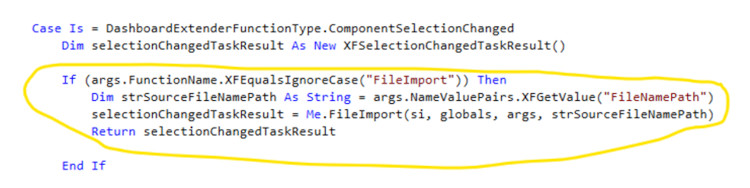
2. The custom function, here it is called “FileImport”, contains the passed in parameter, strSourceFileNamePath, from the File Upload Button. This parameter contains the file path of where the file was uploaded to.
![]()
3. Get the root of the file share folder, append the path passed in with “strSourceFileNamePath” to create the full path of the uploaded file.

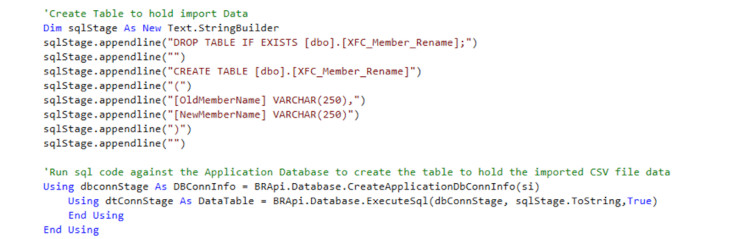
4. Create the table to hold the uploaded file. If you already have a table created, you can ignore this step. In the code below I am dropping the table if it already exists. Then create it with two columns to hold the two columns in the upload file.
5. Define the Field Tokens needed using the names of the headers in the CSV File

6. Create and populate several other variables that will be needed by the BRApi that will be used to load the CSV file to the SQL Table.

7. Then BRApi.Utilities.LoadCustomTableUsingDelimited File will be used to load the file.
![]()
The final function should look like this:

Run the Process
From the dashboard, click on the Load File Button, navigate to the CSV File for upload.
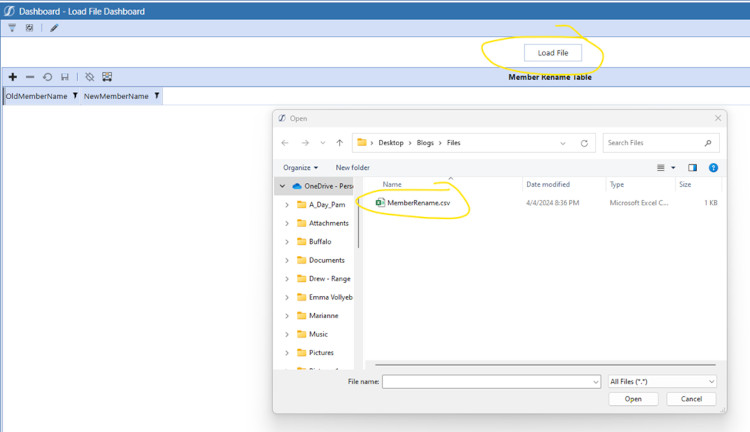
The SQL Table Editor will now display the contents of the CSV File!
Contact MindStream Analytics
Want to learn more about OneStream Software? Please complete the form below and we'll get back to you shortly.
Featured Webinar

Join us for a compelling webinar as we delve into the revolutionary capabilities of OneStream Software for corporate performance management (CPM).
OneStream: The Power of One Platform for Intelligence Finance
Partner SpotLight

OneStream CPM
OneStream aligns to your business needs and changes more quickly and easily than any other product by offering one platform and one model for all financial CPM solutions. OneStream employs Guided Workflows, validations and flexible mapping to deliver data quality confidence for all collections and analysis while reducing risk throughout the entire auditable financial process.