
Blog - Allocation Express Takes Coding Out Of The Equation
Introduction to Allocation Express in OneStream

I recently had the opportunity to implement Allocation Express (part of the OneStream’s CPMx solution). It was extremely easy to set up and eliminated the need for custom allocation business rules to be created which cut down on implementation time significantly.
Configuring Allocation Express: Global Settings
1. I found the “configuration’ process to be simple and intuitive. Once you are in the configuration area there is a Global Settings tab and a Defaults tab.
a. The Global Settings tab is where the allocation DimType, Dimension, Allocated Out Member, and Allocated In Constraint settings are defined. In the example below the Flow dimension is being used to capture allocated out and allocated in data.

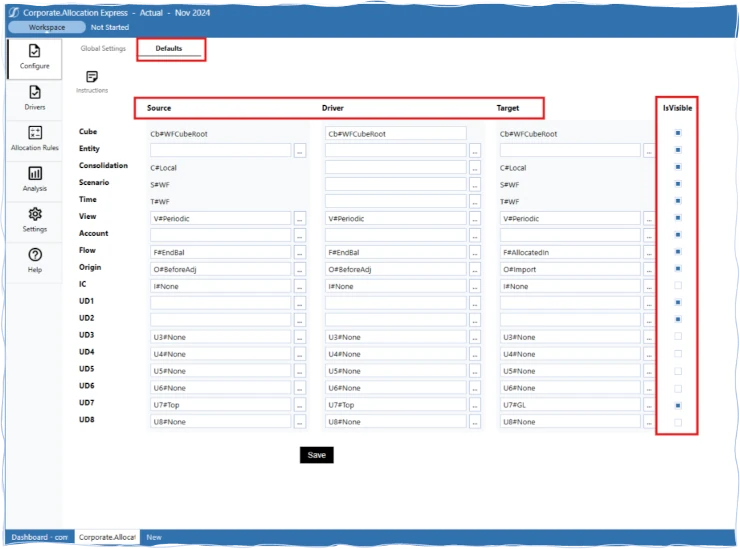
Setting Defaults for Allocation Rules
b.The Defaults tab is where defaults are set for the allocation’s Source, Driver, and Target dimensions for Allocation Rules. The defaults can be made visible in not visible when creating or updating Allocation rules. If you have dimensions that are not in use, then you can set the default value and make that dimension not visible so when working in allocations rules you don’t need to see that dimension. For any dimensions that will change based on the allocation being set up then you would want to make those visible.
Setting Up Allocation Drivers
2. Driver Set Up: Once you’re in the driver set up area you just need to set the dimensions where the driver data is sitting for the allocation. Allocation drivers can be headcount, square feet, or percents as a few examples. Dimension selections will be populated with default dimension members but can be updated as needed. You will notice not all dimensions are available as those were the ones made not visible on the default configuration step.

Creating and Managing Allocation Rules
3. Allocation Rule Setup: In the allocation rule setup area, the following steps will be taken:
- a.Give the allocation a name and description
- b.Set the start and end time the allocation will be available to allocate data
- c.Set the scenario filter for the scenarios the allocations will be utilized
- d.Select the driver for the allocation in the drop-down menu (would need to have been set up in the driver configuration area)
- e.Enable or Disable the allocation. This can be changed on the main allocation rules screen as well.
- f.Enable or Disable lineage. Lineage will provide allocation calculation details in the Analysis area.
- g.Set / Update source and target dimensions. Again, defaults that are not visible will not be displayed for this process.

Navigating the Main Allocation Rule Screen
4.Main Allocation Rule Screen: On the allocation screen the filter radio buttons can be used to show only the allocations that will run for the current workflow POV.
a.The menu bar is intuitive, and a user can take the following actions:
- 1.Create a new allocation rule
- 2.Remove an allocation rule
- 3.Revert & Save changes
- 4.Edit an allocation rule
- 5.Copy an allocation rule
- 6.Execute all enable allocation rules
- 7.Clear all allocations for the workflow scenario and time
- 8.Look at allocation express instructions
- 9.View source data details
- 10.View Driver data details
- 11.View Target data details (if the allocation has been executed previously)
- 12.Complete or revert the workflow
Allocation Express is an intuitive and simple solution to handle allocation needs for clients without the need (in most cases) to create custom allocation business rules. Allocations can realistically be set up in a few hours or less, utilizing Allocation Express.
Contact MindStream Analytics

Want to learn more about The Benefits of Allocation Express for Fast Implementation? Please complete the form below and we'll get back to you shortly.
Featured Webinar

Unlock the power of OneStream Quickviews and elevate your financial planning and analysis (FP&A) process with this insightful webinar hosted by Erick Lewis of MindStream Analytics.
Partner SpotLight

OneStream CPM
OneStream aligns to your business needs and changes more quickly and easily than any other product by offering one platform and one model for all financial CPM solutions. OneStream employs Guided Workflows, validations and flexible mapping to deliver data quality confidence for all collections and analysis while reducing risk throughout the entire auditable financial process.